This post does not provide medical advice. This disclaimer applies. For our open-label study, we used the TENS 7000™, an inexpensive over-the-counter device. We used Syrtenty® one-inch, round, carbon film, adhesive stimulator pads (part number TSYR1000). The instructions below are written for those components.
- Find a set of lead wires in the TENS kit. These are a pair of wires with red and black plugs at one end, joined at the other end to a plug that looks like an audio plug. Attach the red and black wires to the white pigtail wires of two electrode pads.
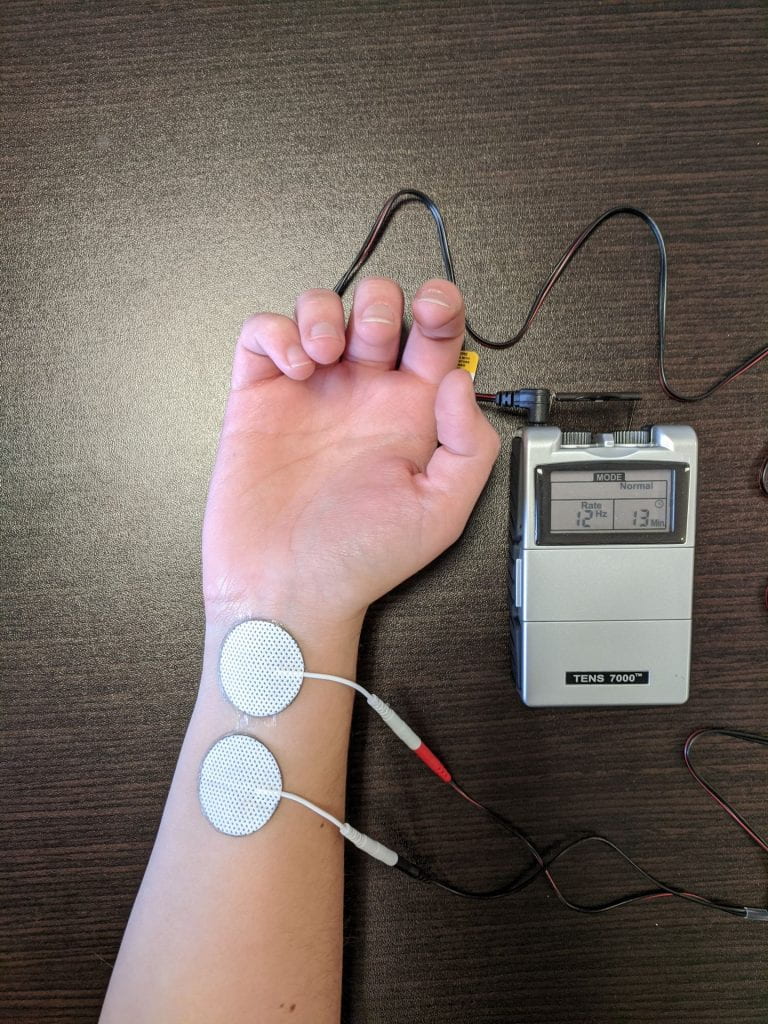
- Find the median nerve on the wrist you prefer to stimulate, as follows. Use your other hand to feel the wrist. If you flex your wrist (i.e., when your palm is up, bend your palm almost 90° towards your face), on your wrist just below your palm you’ll find a large tendon stands out. Note where that tendon is (maybe the first time you try this, mark it with a dot of ink). Now relax your wrist. Then press your ring finger and thumb together at the fingertips and flex your wrist again while doing so. You should be able to feel another tendon popping up next to the one you felt earlier, a little farther from your thumb. You’re going to aim between these two tendons.
- Take the electrode pad that’s connected to the red plug. Remember, “Red, Wrist.” Place the center of this first electrode pad on the line between those two tendons, with the top edge of the pad at the crease where your forearm meets your wrist (because if it overlaps the crease, hand movements may loosen the adhesive).
- Now take the electrode pad connected to the black wire. Remember “Black, Back.” The center of this second electrode should fall on a straight line between the center of the first pad and the midline of the horizontal crease between your upper arm and forearm when your palm is up. The top edge of the second electrode should be about 4.6 mm (a little under ¼”) from the bottom edge of the first electrode. See the picture for reference. (The goal was to separate the centers of the two electrodes by 30 mm; hence the odd distance between them. But the exact distance doesn’t matter given the size of these electrode pads, so don’t spend more than a few seconds on it.)
- Leave the wires disconnected from the TENS device for a minute while you set up the device.
- Turn the TENS device just barely on by turning either knob at the top of the device until you just feel a click.
- Lift the middle section of the Tens unit cover to display the control buttons. Press the mode button until MODE at the top of the display reads “Normal”.
- Press the set button to find “width,” and use the arrow keys to select a pulse width of 200 μs.
- Press the set button to display “rate,” and select a rate of 12 Hz.
- Press the set button again to select the time you want the stimulation to run for (shown on the right-hand side of the display). For this study, set the device to “continuous.” To do this, increase the time to 60 minutes, then press the up arrow one more time. You should now see a small “C”. After a few seconds, the device exits “set” mode and the display will stop blinking.
- Make sure the knob is at the lowest setting that leaves the device on.
- Insert the plug at the other end of the lead wire set connected to the pads on your wrist into the jack at the top of the TENS device next to the knob you turned on.
- Now slowly dial the knob clockwise to increase intensity. First you’ll feel sensations in your hand and/or forearm. Try to keep your stimulated hand relaxed. As you keep increasing the current slowly, eventually you’ll see small, rhythmic twitches in the thumb on the stimulated hand. Leave the knob at the lowest setting that makes your thumb twitch visibly.
- Close the protective cover over the knobs.
To turn off your device, turn the control knob counterclockwise until you hear the click and the device turns off.